SSL for Ubuntu Plex Media Server
Installing certbot
sudo apt-get install software-properties-common
sudo add-apt-repository universe
sudo add-apt-repository ppa:certbot/certbot
sudo apt-get update
sudo apt-get install certbot
Issuing a certificate
Now, let's run certbot to issue a certificate for our server:
sudo certbot certonly

Select 1: Spin up a temporary webserver (standalone) and press enter.
Follow the instructions on your screen until it asks for your domain name:

Once the certificate has been created by certbot, we need to convert it to PKCS#12 format, since it is required by Plex Media Server.
sudo openssl pkcs12 -export -out /var/lib/plexmediaserver/certificate.pfx \
-inkey /etc/letsencrypt/live/<server's domain>/privkey.pem \
-in /etc/letsencrypt/live/<server's domain>/cert.pem \
-certfile /etc/letsencrypt/live/<server's domain>/chain.pem
It will ask for a password twice, which will be used in Plex settings.
Our certificate is located in /var/lib/plexmediaserver/certificate.pfx and we need to change the ownership to plex user:
sudo chown plex:plex /var/lib/plexmediaserver/certificate.pfx
Plex Media Server settings
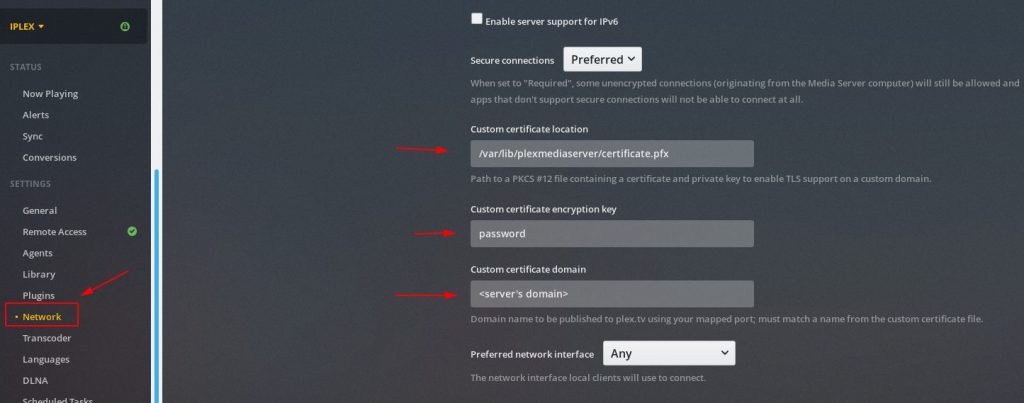
Navigate to http://<server's domain>:32400/ and see the following screenshot.

Navigate to Settings > Network and fill the appropriate fields as shown above. Save when finished.
I had to restart the plexmediaserver service for the changes to take effect.
sudo service plexmediaserver restart
Now, if you navigate to https://<server's domain>:32400/ you'll see the green padlock.

Steps taken from srilankanchurro GH